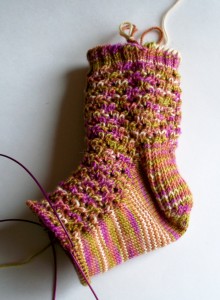
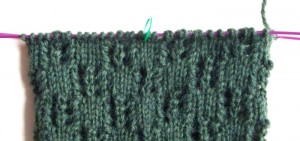
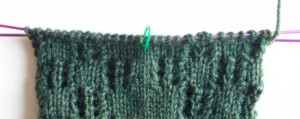
I just spent a week in London at Knit Nation, and all I have to show for it is this:
Oh, don’t get me wrong. Knit Nation was a blast, as you can see on the other teachers’ blogs. I just couldn’t be bothered to record it in photos. (Go ahead, call me lazy. It won’t hurt my feelings.)
Some of my favorite parts of Knit Nation:
- Being in London! The architecture, the museums, the food, the Underground, the shopping… oh, if only London weren’t so far from Oregon, I’d go once a year rather than once a decade.
- Catching other Underground riders sneaking peeks at me, while I was knitting in public. Some were clearly intrigued (why? surely others must knit on the Underground), yet no-one said a word to me.
- Having a 10th-floor classroom, with windows overlooking tony neighborhoods and the Royal Albert Hall. Even the locals peered out the windows, oohing and aahing at the views.
- Meeting a whole new slew of students, some from very different knitting traditions. It was gratifying to be able to share new cast-ons with them, and new uses for crochet hooks, even if our knitting styles were dramatically different. Most likely, I’ll never master a pencil-hold throwing style, and they’ll never adopt a continental combination style, but we were able to meet in the middle!
- Alice and Cookie’s ever gracious and unflappable staff. Any event—especially a new event—is going to have its minor hiccups, and this crew managed to overcome them cheerfully.
- Seeing all the other groups staying in the Imperial College dorms. At breakfast, they’d work their way through the cafeteria in waves: the college students from Texas; the oh so fashionably dressed Italians with matching yellow backpacks; the Japanese Girl Scouts in blue and white uniforms.
- Finally realizing, after years of teaching on the road, that if I want green tea or mint tea rather than coffee or black tea, I can travel with my own tea bags. Better yet: realizing I could buy tea in London. Why did it take me so long to figure this out?? (Okay, I must be slow on top of being lazy.)
But back to the sock-in-progress. Getting ready for the trip, I packed at least four projects, including two sock designs, some lace, and yarn for swatching for a sweater. In the end, though, the project that called to me the loudest—and that received all my attention, leaving all the other projects untouched—was a sock design for which I had written up most of the pattern over a year ago, then set aside for who knows what reason. It was relaxing to cast on and just follow the instructions since, most of the time, I’m figuring out the pattern as I’m knitting the sample.
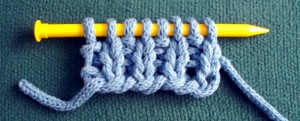
This sample makes use of the Channel Islands cast-on:
Though I think I’ll include instructions in the pattern for working other sorts of cuffs as well, in case the knitter doesn’t care for this one.
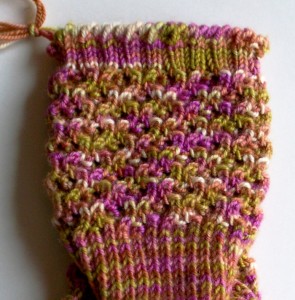
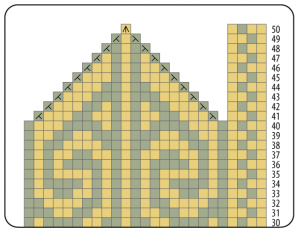
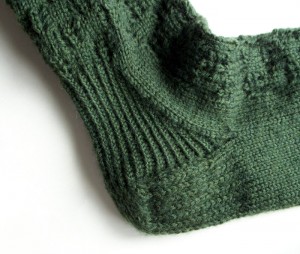
The stitch pattern—a simple lace and rib number that promises to be super comfy—flows nicely from the cuff’s ribbing and into the heel flap:
And I’ll probably finish off the patterning on the instep by bringing it to a point. That’s so much better than abruptly switching to stockinette just before starting the toe, don’t you think?
Jumbotron
By JC | July 25, 2010
Recently I haven’t been blogging about interesting knitting projects because… well, because this is what I’ve been knitting:
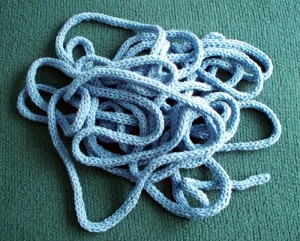
Oodles of I-cord. Yards and yards of I-cord. Knit by hand, because I don’t have a knitting mill that lets you crank out the I-cord by the mile. And when I asked my knitting buddies if anyone had one I could borrow, I was told the mills didn’t handle worsted-weight yarn too well. True or not, I decided to just dive in and get ’er done. I think it was about three or four evenings’ worth of boob-tube knitting.
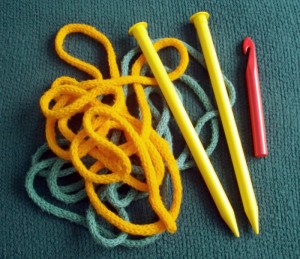
This new I-cord, aka jumbotron yarn, joins my existing jumbotron set:
I’ve been using them for a few years now, when teaching Cast-on Cornucopia, Bind-off Bonanza, and Hook Hocus-Pocus. They’re fabulous for letting me demo techniques at the front of a classroom, and still have everyone in the back of the room see what I’m doing.
The new jumbotron yarn will let me knit bigger swatches for use in class:
Tubular bind-off, anyone?
All this is in preparation for Knit Nation, which starts on Thursday. My flights leave tomorrow, though, so I can get there on Tuesday and have Wednesday to adjust to the time zone difference. So… I’m off to pack!
Tempe
By JC | July 23, 2010
It’s official: this September I get to teach at Tempe Yarn and Fiber. I’m looking forward to it—I’ve heard all kinds of good things about the shop.
The weekend of September 23-25 will feature Bind-off Bonanza, Chart Reading, and Chart Writing, which I’ve been teaching a fair bit lately. And I get to dust off the samples for All Thumbs and Get Twisted!, a couple favorites that have been stuffed in the back of the closet for too long. Interested? Give the shop a call at 480-557-9166.
I figure the only thing better than Tempe in September would be Tempe in, say, March, when those of us living in Oregon’s lovely but drizzly Willamette Valley have begun to forget what sunshine looks like.
Too much
By JC | July 22, 2010
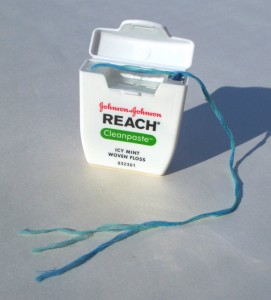
You know you spend too much time thinking about knitting when you try out a new dental floss, and it shreds…
…and the first thought that runs through your head is, “Must’ve been loosely plied.”
That depends
By JC | July 15, 2010
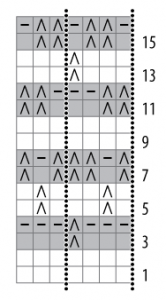
Another bit of early feedback on Charts Made Simple questioned how mosaic charts are drawn: If the mosaic is worked on a base of garter stitch, should the chart squares have a bar or some other sort of “purl” designation, to indicate the garter ridges? In other words, does stockinette mosaic use different symbols than garter mosaic?
That depends. Who’s drawing the charts? And do they care if you use stockinette or garter?
As always, hunting through existing books and magazines reveals that different authors and publishers have selected from a fascinating array of charting options. The original way of charting mosaic patterns, as Barbara Walker set out in Charted Knitting Designs in 1972, does not distinguish between stockinette- and garter-based mosaic. Rather, the knitter is allowed—encouraged, even—to choose for herself. Ms. Walker even suggests mixing the two, using stockinette for one color and garter for the other, or using stockinette for one repeat and garter for the next.
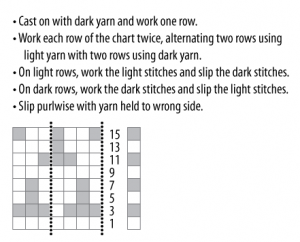
Note that each chart row represents two rows of knitting. Stated another way, each chart square represents one element of the mosaic design, even though that element happens to be two rows tall. Such charts are clean and compact, and resemble the end result well. You see them sometimes in published patterns—for example, in the pattern for Lynne Vogel’s Tree of Life Mosaic Jacket, in Knitting in America. You have to read the pattern (or be familiar with mosaic charts) to know how to follow the charts. And you have to read the pattern (or glance at the photos of the jacket) to know that you’re supposed to work the mosaic in garter stitch.
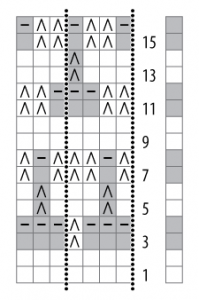
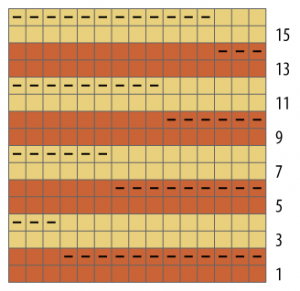
Often, though, charts for mosaic knitting are drawn just like other charts, with one chart row for every row of knitting and with symbols indicating when to slip, knit, or purl. This takes up more space, but doesn’t require any extra explanation, and does let the designer specify stockinette vs. garter. Such charts can resemble the fabric reasonably well, if the slip stitches are shown in the slipped color.
Or they can be a mess of meaningless stripes, if the slipped stitches are shown in the current working color.
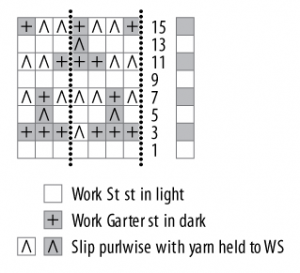
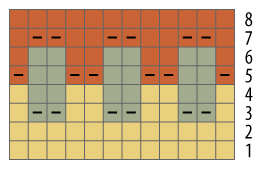
Me, I’m in favor of charts that resemble the end result. So I’m intrigued by charts that take a “hybrid” approach, with one chart row for every two rows of knitting, and with symbols indicating when to slip, and when to work stockinette vs. garter. You can see a few of these charts in Beautiful Knitting Patterns by Gisela Klöpper. I’m not fond of some of the symbols used in the book—in particular, for decreases and for cable crosses—but the mosaic charts strike me as complete, reasonably clear, and yet compact.
Once again, the only hard and fast rule is that you can’t make any assumptions when reading a chart. You have to read the key—and any special instructions—that come with the chart. Of course, that’s assuming you want to create the project exactly as the designer intended. If you want to interpret a chart “creatively” and do your own thing, go for it! I’m sure Ms. Walker would approve.
In the past few weeks, I’ve sent an early draft of Charts Made Simple to a few knitters, and asked for feedback: Does the book cover what it should? And does it do so in a friendly, encouraging way? Some of the responses have been fascinating. (And some scary, like the one noting the utter total mismatch between a photo and its caption—eek! Just the sort of thing that can slip through multiple rounds of editing, only to burst out of hiding once the book is printed.)
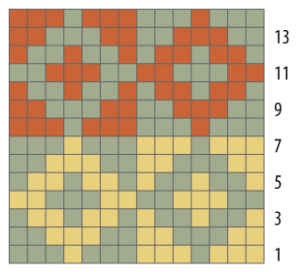
One knitter asked why the book didn’t draw a distinction between color charts and texture charts, why it didn’t explain how they have to be read differently. I had to say I didn’t see a sharp distinction, but a spectrum. At one end, you have charts for stranded or intarsia knitting, with colors in the chart squares.
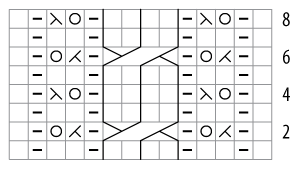
At the other end, you have charts for lace, cables, knit/purl patterns, and other forms of texture, with symbols in the chart squares.
And in the middle? All sorts of charts! Consider a mitten chart showing stranded colorwork and shaping: a few of the charts squares are filled with both color and a symbol.
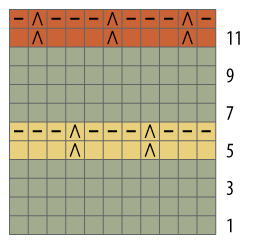
Or slip-stitch patterns: many chart squares specify both color and some sort of symbol.
Or charts for shadow knitting: it’s the texture added by the garter ridges that turns simple stripes into subtle, viewed-at-an-angle color patterns.
Or Bohus-style charts: strategically-placed purls elevate stranded colorwork beyond stockinette into a gorgeous new realm.
As I see it, you read all these charts remains the same way. You keep in mind that the chart shows you a picture of the right side of the fabric. You read the chart in the same direction you knit: from the bottom up, back and forth if knitting flat or always from right to left if knitting in the round. And you let the contents of each chart square tell you how to create the next stitch. According to the chart’s key, you might need to knit with a specified color, k2tog with another color, or just plain k2tog. That’s chart reading, in a nutshell. And it doesn’t require drawing a distinction between color charts and texture charts.
Or am I missing something? Is it possible to draw a useful distinction between color charts and texture charts? Is it possible to say, “Do this when following color charts, but do that when following texture charts”?
A quick fix
By JC | July 3, 2010
I’m a sucker for completing projects, for crossing items off my to-do list. Making progress isn’t enough: I need to finish projects on a regular basis, or I get as antsy as a junkie going through withdrawal. So, in need of a quick fix, I turned to my UFO pile.
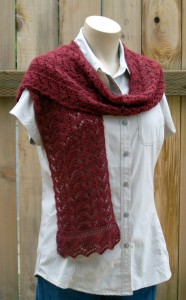
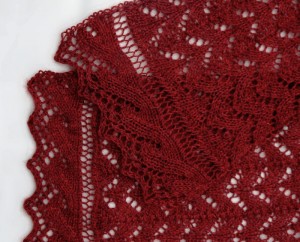
Sad to say, I found a lace scarf that was all done but for the sawtooth edging at the end. (Oh, why had I set it aside?) Once I found and deciphered my skimpy notes, and figured out how to get the end to match the beginning (ah, perhaps that was the reason!), it was done in no time.
The scarf measures 7 x 60″ (18 x 152.5 cm), all from one skein of Berroco Ultra Alpaca Fine.
I really liked working with that yarn. It’s a nice blend of 50% Peruvian wool, 20% superfine alpaca, and 30% nylon, with a heathery, almost rustic look. Since it passed the itch test—
You know about the itch test, right? Stick a washed and blocked swatch against your skin and under a bra strap or into your waistband, and go about your day. If you’re dying to remove the swatch in just a few minutes, look for another yarn. If you forget the swatch is there and it falls out of your clothing hours later, you’re good to go.
—I’m tempted to use it in a sweater, maybe something cabled, maybe something that plays up the yummy colors. Rather than the 3.5 mm (US size 4) needles I used for the scarf, I’d most likely use 2.75 mm (US size 2) needles. Well, that’s where I’d start swatching, anyway. Or I’d try Ultra Alpaca Light on 3.5 or 3.75 mm (US size 4 or 5) needles. But it’s a slightly different blend—50% Peruvian wool and 50% superfine alpaca—so it would need its own itch test. I’m a little sensitive to alpaca, you see.
When I started this scarf a year (or two?) ago, I didn’t have any real notion of writing the pattern up. (Hence the skimpy notes.) But in a fit of “I don’t want to work on what I should be working on,” I went ahead and wrote the pattern anyway. You can find it on Patternfish.
I had high hopes of completing another pattern today, but… well, we’ll leave that for another blog post.
Last weekend was Black Sheep Gathering. As usual, it was a blast and a half. I missed out on the Sheep to Shawl competition, but I got to watch Judith MacKenzie McCuin at work in the fleece judging—wow, what an education! (Judith, how do you hold so much fiber info in your head??) Wandering the market wasn’t a shopping experience so much as a social experience, a welcome chance to catch up with people that I see only once every few months.
And I taught classes: Hook Hocus-Pocus, Cast-on Cornucopia, and Bind-off Bonanza. All three went well enough, though as luck would have it, I realized on the drive home that I neglected to answer a student’s question.
See, I like to start each class by asking if anyone has anything specific they came to learn: something mentioned in the class description, something related to the class topic, whatever. It helps me figure out where to focus our time. Sometimes I’m smart, and I write these requests on the classroom’s whiteboard so I can cross them off as we progress through the class material. Sometimes I’m not, and a topic falls through the cracks.
The topic that fell through the cracks this Saturday was choosing cast-ons and bind-offs that match each other. Here’s my belated answer:
- Match a standard pass-stitch-over BO perfectly with a crocheted CO. Bonus: pso BOs and crocheted COs also match chain selvedges created by slipping the first stitch of every row.
- Cast on provisionally, leaving a long tail. Knit the project, and BO the ending edge using your choice of BO method. Then release the provisional CO, and BO the starting edge using the same BO method.
- Use tubular CO and tubular BO, if you have ribbing at both the starting and ending edges of your project.
- Use a sewn BO to match a long-tail CO.
Anybody have any other ideas for matching CO and BO?
Flow
By JC | June 14, 2010
Designing is lot like puzzle-solving. How do you get all the pieces—the yarns, the colors, the stitch patterns, the shaping details—to fit together into a cohesive, appealing whole? My favorite part of the puzzle is getting the stitch patterns to flow into each other, and into the space made available by the shaping. It usually involves visualizing (in my head, or on paper with charts), tinkering, and swatching. Sometimes a little serendipity gets thrown in too.
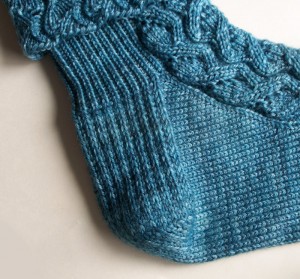
The Yachats socks have a nice bit of flow at the heel. Twisted rib on the back of the leg blends right into the slipped-stitch pattern on the heel flap. And then the stockinette on the gussets flows into the stockinette on the sole, as is typical for top-down socks with flap-and-gusset heels.
Last week’s sample sock, though, was toe-up. Choosing a flap-and-gusset heel for it opened up a new and intriguing design puzzle—namely, what stitch pattern to use for the gussets and back-of-heel area?
One option was stockinette, as for a top-down sock. Dull, dull, dull! Besides, it wouldn’t flow into the Butterfly Lace pattern I wanted to use on the leg.
Another was Butterfly Lace… but lace at the back of the heel wouldn’t make for a long-wearing sock. And gusset decreases in lace? Unnecessarily fiddly.
So, with Yachats still fresh in my mind, I went with twisted rib.
The ridges of the slipped-stitch heel flap (here, on the bottom of the sock) flow through the heel turn, and into the twisted rib. Serendipity bonus: the rib then flows reasonably well into Butterfly Lace on the leg.
Overall, I like the effect. But I imagine changes to the lace that would make it better, that would increase the amount of flow between the parts of the design. And you know I’m all about the flow.
For the past couple weeks, I’ve been adding illustrations to Charts Made Simple. The goal has been to get the manuscript ready for review next week: four friends have graciously agreed to look at this early draft, and tell me where it still needs work. Having that deadline has, understandably, lit a much-needed fire under my butt.
Most of these newly-created illustrations have been photos of swatches, which is another way of saying I’ve been sitting around knitting during the day. (That has felt tremendously weird, as I normally let myself knit in the evening as a “reward” for having done “real” work during the day.) For one set of photos, though, I felt compelled to knit an entire sock, taking WIP photos along the way.
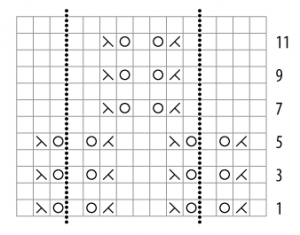
Charts Made Simple uses these WIP photos to illustrate a series of points related to repeated stitch patterns. Take this chart, for example:
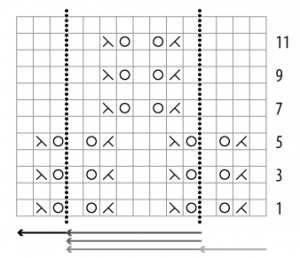
Knitters familiar with charts can probably guess that the dotted lines are “repeat lines.” Like the * or [ ] of written instructions, they surround the stitches that get worked multiple times. The stitches outside the repeat lines are “edge” stitches that let the stitch pattern appear balanced left and right. They get worked only once per row. That is, for each row of the chart, work the edge stitches at the first edge once, repeat the stitches between the dotted lines as many times as necessary for the width of your piece, then end by working the edge stitches at the second edge just once.
But what if you’re working in the round? Ah, that’s where our sample sock comes in.
When you’re working a repeated stitch pattern over just a portion of a round—such as the instep (but not the sole) of a sock foot—then you want to follow the chart as when working flat, working the edge stitches once per round.
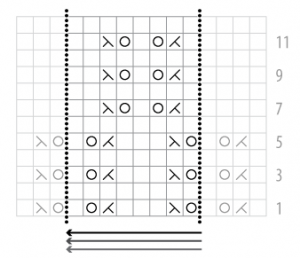
But when working a repeated pattern all the way around a piece—such as a sock leg—omit the edge stitches. Just work the repeated stitches.
After all, a round of knitting is a circle, and a circle doesn’t have beginning or ending edges, now does it? So the edge stitches aren’t necessary.
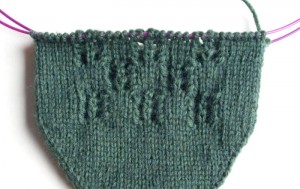
Here’s the kicker: if you goof, and work unnecessary edge stitches, you’ll get a “hiccup” in your patterning:
So, this is the sort of stuff that Charts Made Simple is all about. Pictures being worth a thousand words, you can probably see why I’ve been knitting so many samples.
And this sample sock? Will it turn into a pair? Probably. Even though I just threw it together to illustrate some points, without my usual swatching and scheming and planning, it’s pretty comfy. Not terribly pretty, though. I’m tempted to tweak the design a little—I have some ideas tugging at me—and re-knit it in a more colorful yarn.
We’ll see. Charts Made Simple is still tops on my to-do list.


