

The original plan was to map a doily pattern and convert it to a wedge shape. But once that was done, I found I couldn’t stop fiddling.
Looking at the stitch map for the wedge, I noticed that it would be possible to knit Coronet in the round without ever having to shift the beginning-of-rounds marker. Consider this highlighted section:
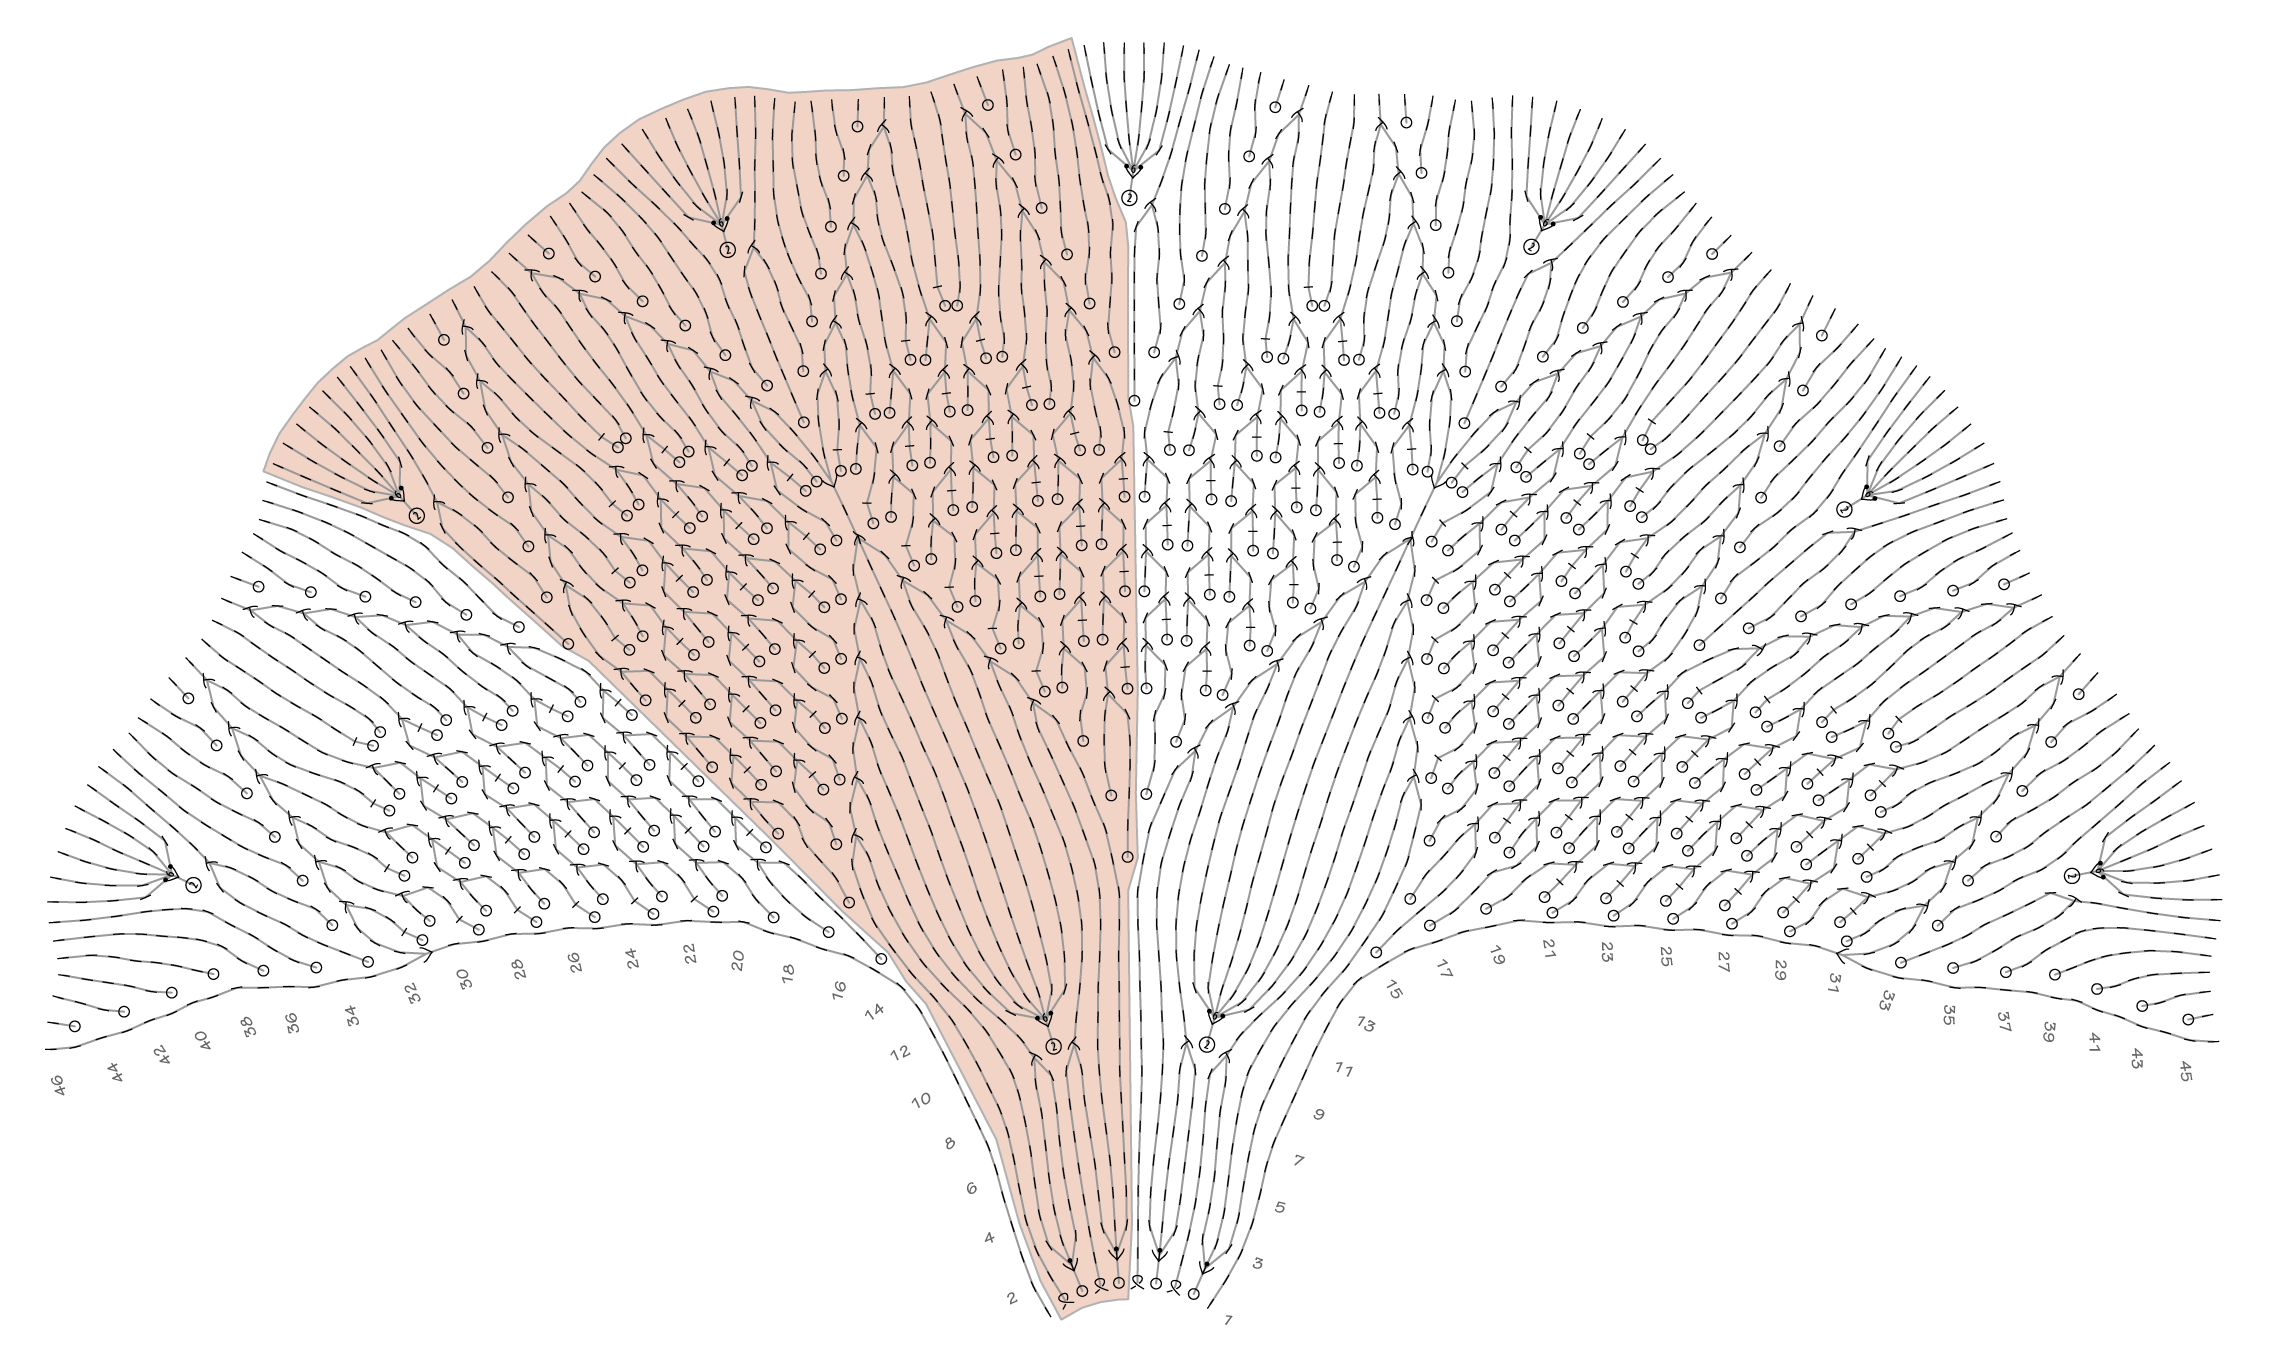
The “gotcha!” is that, on three rounds within the hex mesh section, you’d need to keep the beginning-of-rounds marker in the middle of a double yo. That might not be everyone’s cup of tea.
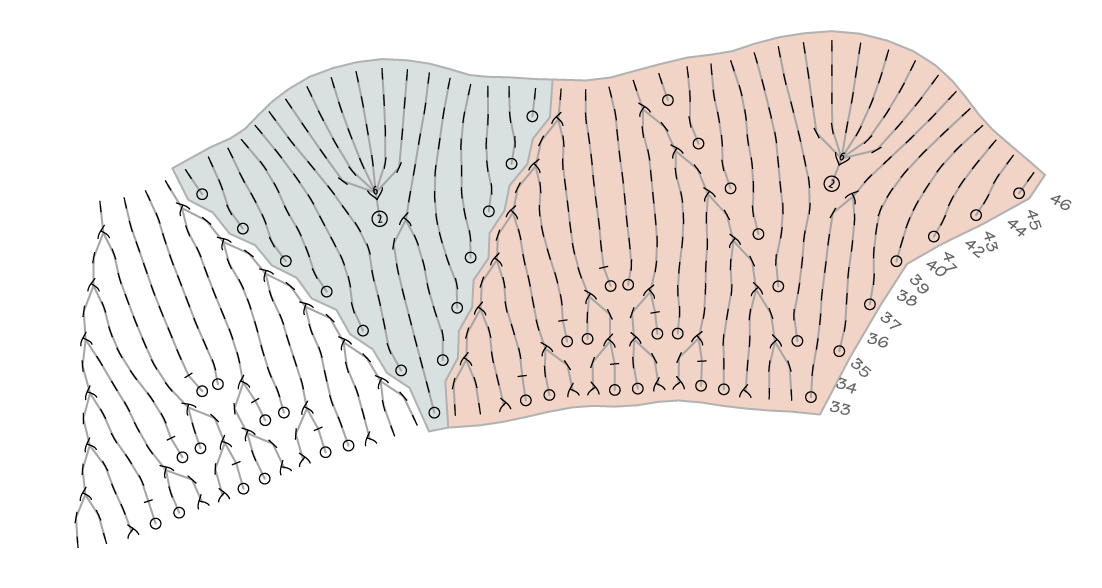
Ooh! What if the repeated and extra sections were defined differently?

Ha! A lot of the wedge’s funkiness goes away.

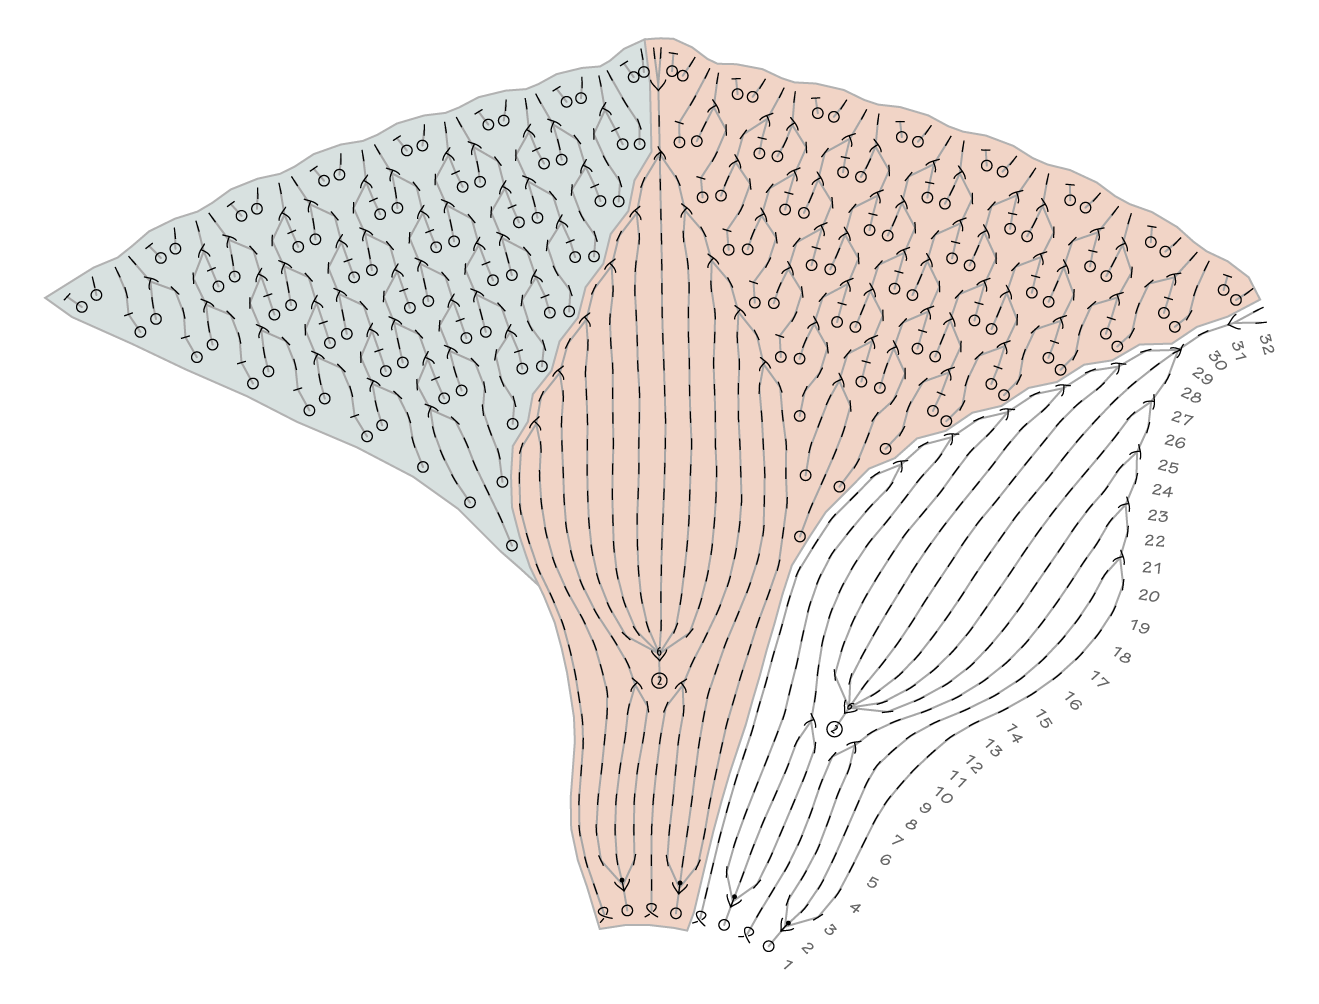
Also: what about using the last few rows as an edging, say, to a crescent shawl?

Mm, yes, that could be fun.

Okay, this was the fun part: color-coding the in-the-round stitch maps for Coronet, using one color for the repeated stitches and another for the “extra” stitches needed to balance the pattern when working it flat.
I went the high-tech route, exporting the stitch maps as PDFs and tweaking them in Illustrator. But low-tech routes are possible too: saving a stitch map as a PNG and annotating it in any drawing program, or even printing a stitch map and having at it with colored pencils.
Was this color-coding really necessary? I suppose not, but it helped with the next step of the process. And, like I said, it was fun.
Next up was creating a new stitch map for use flat, as a wedge. Using the color coding as a guide, and entering each row in the form of “*repeated stitches, rep from *, extra stitches,” I did fine through row 32.
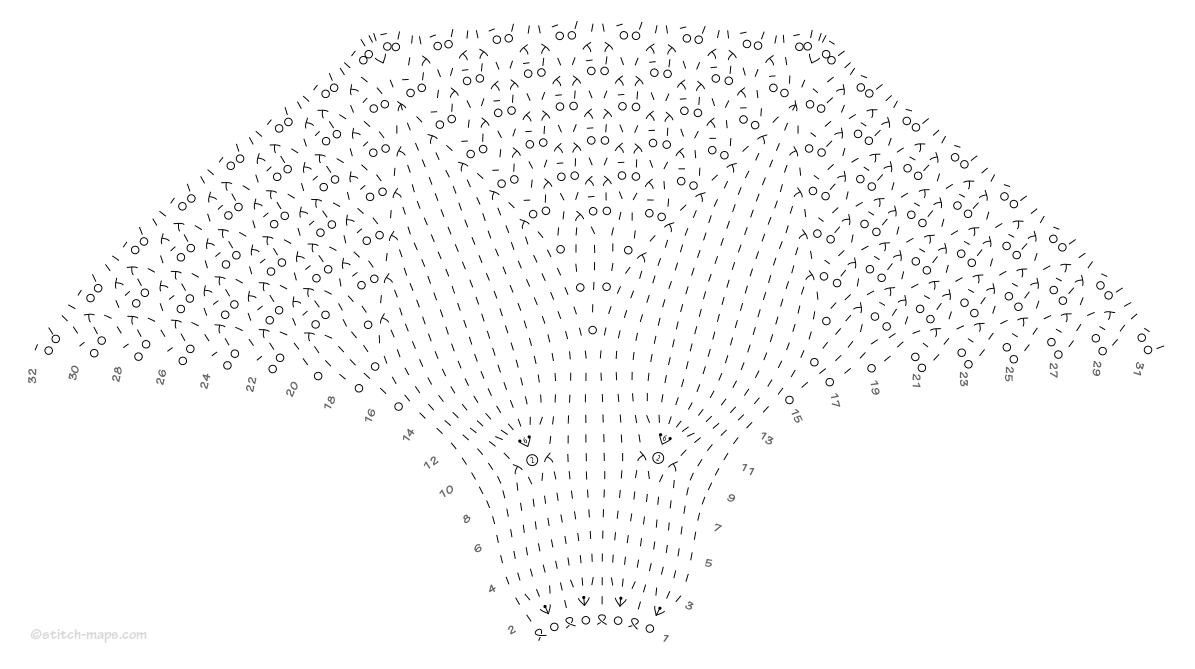
At row 33, I ran into a hiccup. To get all the stitches to line up nicely, it had to start one stitch further to the right. Fine, fine, so I added selvedge stitches to the wedge, then continued entering the remaining rows.

And ta da! Okay, so the final stitch map is shaped kind of funny. It looks too narrow in the first few rows. Would the extra-large eyelets created on rows 10 and 11 “balloon out” and let the final fabric take a proper wedge shape? Or would the initial rows need to be modified? Swatching would give the answer, of course.
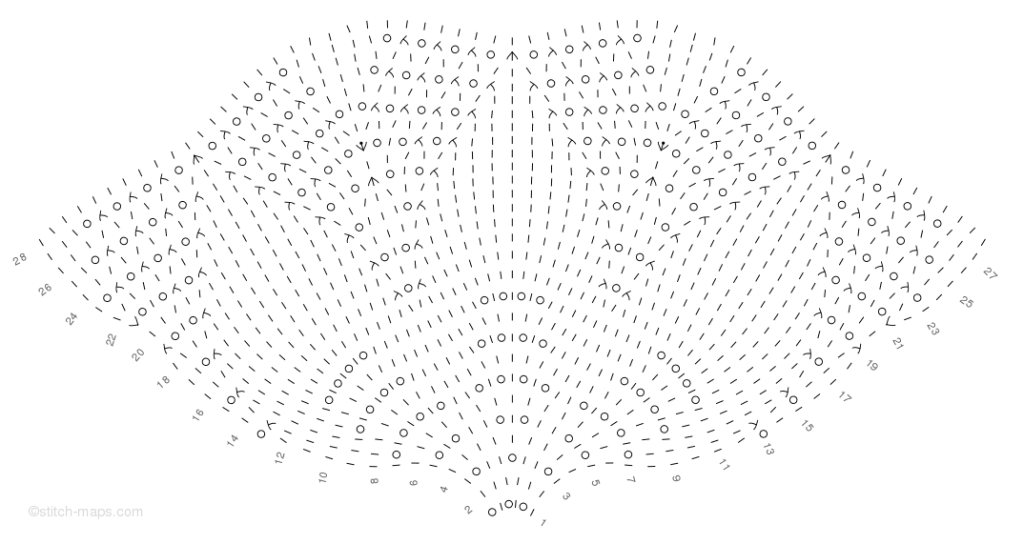
Over the weekend I was seized by the need to map a lace doily pattern and convert it to a wedge shape. (You know, because I just can’t get enough charting in my life.) I chose Coronet, from Marianne Kinzel’s First Book of Modern Lace Knitting.
The first step was converting the lingo. Kinzel uses “K.1B” for “knit 1 through back loop,” Stitch-Maps.com uses “k1 tbl;” Kinzel uses “M.2” for “knit into front and back of next st,” Stitch-Maps.com uses “(k1, p1) in next st;” blah, blah, blah. Actually, that was about it for abbreviations. Really, the most substantial substitution was using “*yadda, repeat from *” rather than “[yadda] 6 times” so that Stitch-Maps.com could draw a variable number of horizontal repeats.
Entering just a couple rounds at a time so I could catch my goofs along the way, I started building up the stitch map, paying close attention to the double yo: Kinzel could just say, “on following rows, knit into one yo and purl into the other,” but that language doesn’t fly at Stitch-Maps.com. So I carefully entered phrasing like “Round 26: *K6, p1, [k3, p1] 4 times, repeat from *.” Yeah, it was tedious, but I was liking the results:

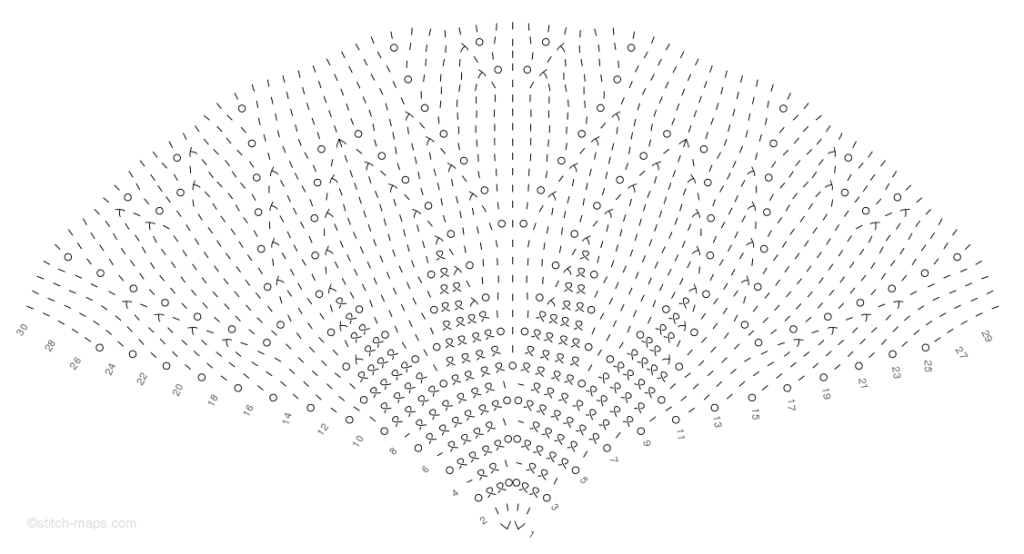
Until I got to round 33, where Kinzel instructs the knitter to move the beginning-of-rounds stitch marker one stitch to the left. Whoops. Stitch-Maps.com doesn’t handle that sort of thing. (I’m gonna have to re-think that limitation.) So I cheated, creating two stitch maps for Coronet: one for Kinzel’s parts A and B, shown above, and another for part C:

More fun ensued, converting these stitch maps for knitting a doily in the round into a single stitch map for knitting a wedge shape flat. But that’ll wait for another blog post.
Have you seen New Vintage Lace? I love this book! Andrea Jurgrau takes vintage doily patterns, lifts out and rejiggers their intricate motifs, and reinvents them as stunning hats, scarves, stoles, and shawls.
It’s a fabulous idea, really. Those vintage patterns contain motifs unlike any in today’s stitch dictionaries: starbursts, overlapping petals, and lush leaves, often placed on a backdrop of open mesh. They’re really quite spectacular… and yet, until New Vintage Lace, I haven’t seen many contemporary designers making use of these motifs.
What can I say? I’ve been inspired. I’m itching to go through some of my vintage pattern books – like Gloria Penning’s Danish Lace Treasures – and see the doilies as stitch maps. More to the point: to tease out wedge shapes that could be used in wedge shawls. Ooh, wouldn’t that be fun?
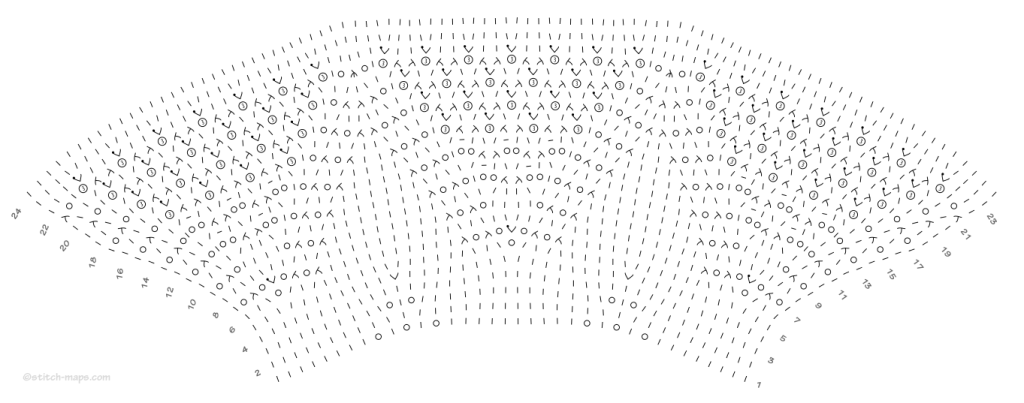
I’ve already fiddled around with a couple patterns from New Vintage Lace, creating wedges from the Peaseblossom Doily:
And the Sand Dollar Wrap:
See those double yo on rounds 3, 5, and 7? It seems a lot of vintage patterns use them instead of today’s more typical yo, k1, yo. You get a very different appearance! One large eyelet, instead of two little ones flanking a skinny little k1 column.
New Vintage Lace also has me thinking about taking the last several rounds of a doily pattern, and using them as the slightly flared edging of a stole like Jurgrau’s Cherry Blossom Stole, or as part of a crescent shawl like her Diospryros Wrap. Consider he final rounds of the Elizabeth doily from Gloria Penning’s Knitted Heirloom Lace III:
Wouldn’t that make a lovely edging?
Now if you’ll excuse me, I have some more fiddling around to do.
You know how I said Stitch-Maps.com would throw up its hands and say, “I can’t do that” when asked to draw a cable cross on a WS row? Well, I’ve been convinced of another approach. Tech editor extraordinaire Karen Frisa has pointed out that a cable cross abbreviation can be interpreted in a couple ways.
I had been planning on interpreting them like other knitting abbreviations – namely, in terms of what-you’ll-do, regardless of whether it’s a RS or WS row. This affects the appearance on the RS, hence my WS conundrum.
But they can also be interpreted in terms of what-you’ll-see. If 2/1 LPC means “do what ya gotta do, such that on the RS you see two knits crossing up and to the left over one purl,” then 2/1 LPC will be worked differently on RS and WS rows… but you’ll get the same appearance on the RS, so the same symbol can be used on both RS and WS rows.
Privately, another tech editor – one that I respect greatly – concurred with Karen. And so Stitch-Maps.com will accept cable abbreviations on both RS and WS rows, without any silly “We’re unable to work whatever on a WS row” error messages. And its key will define how to work cable crosses on both RS and WS rows. I figure this approach ought work well 99.99% of the time, if not more.
Still, interpreting some abbreviations as what-you’ll-do and others as what-you’ll-see gives me a slight case of the heebie-jeebies. But that’s just because I’m a nut for consistency. Don’t worry, I’ll get over it.
Cable crosses are typically worked on right-side rows. But what if Stitch-Maps.com is asked to draw a cable cross on a wrong-side row? What should it do then?
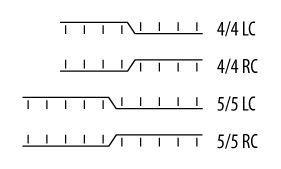
Take 2/2 RC, for example.

It’s defined as “Slip 2 sts to cn and hold in back, k2, k2 from cn” – that is, knit all the stitches. That’s why the symbol contains four little vertical lines: each is meant to represent a knit stitch.
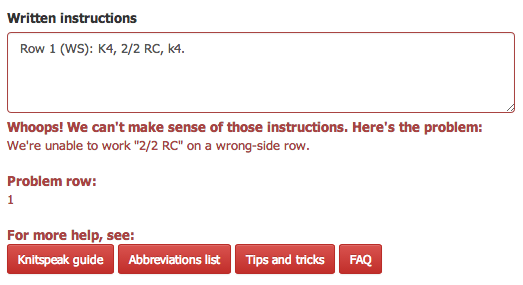
But if 2/2 RC is placed on a WS row via written instructions like these:
Row 1 (WS): K4, 2/2 RC, k4.
Then the symbol doesn’t make sense anymore. Knitting on the wrong side creates purl stitches on the right side. If you maintain that symbols ought to show the right-side view of each stitch – as I really, truly do, because that’s how you get charts that resemble knitted fabric – then the symbol you’d need to display would look something like this, which uses dots to stand in for purl bumps:

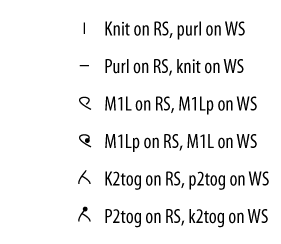
So far, the approach I’ve taken at Stitch-Maps.com has been to define symbols for representing both the right- and wrong-side view of each stitch. In many cases that’s been pretty easy, because many stitches come in RS/WS complement pairs: knit is the flip side of purl, M1L is the flip side of M1Lp, and k2tog is the flip side of p2tog.
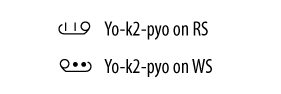
In a few cases, I’ve had to invent some symbols – for example, to represent Japanese cluster stitches like yo-k2-pyo when worked on the wrong side rather than the right side.
But is this the right approach for cable crosses? Does Stitch-Maps.com really need right-side and wrong-side versions of 48 cable cross symbols? I have to imagine that having 96 cable cross symbols – half of which would rarely, if ever, appear in a stitch map – in the key would make the key unbearably long and difficult to wade through.
So here’s what I propose. For starters, Stitch-Maps.com won’t try to draw cable crosses on wrong-side rows. Rather, when asked to do so, it’ll display an error message like this one:
If this proves too limiting, additional symbols can be added to the key later, on an as-needed, case-by-case basis. In the meantime, if anyone really wants cable cross symbols to appear on both odd- and even-numbered rows, it would be possible to enter the stitch pattern as a series of all-RS rounds, not alternating right- and wrong-side rows.
Your thoughts?
With hundreds of possible cable crosses, where should Stitch-Maps.com draw the line? Which cable crosses should it support, at least at first?
To figure this out, I pulled a dozen stitch dictionaries, reference books, and pattern books off my shelves. Which cable crosses did they use?
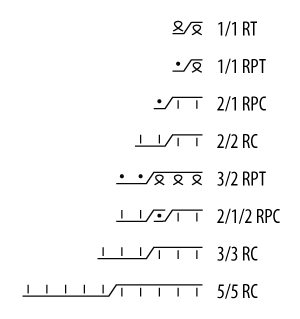
The results were interesting, though not too surprising when you think about it. The most commonly used cable crosses appear to fall into just four categories.
1/1 and 1/1/1 crosses of all sorts
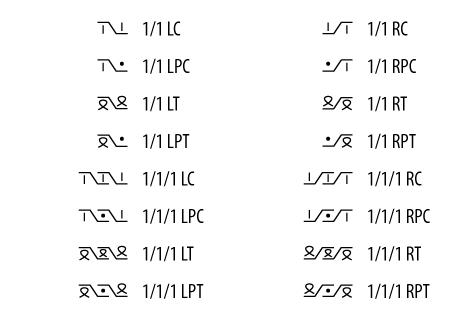
Lots of delicate and detailed textures are possible with these tiny crosses.
Crosses with 2-stitch strands on top
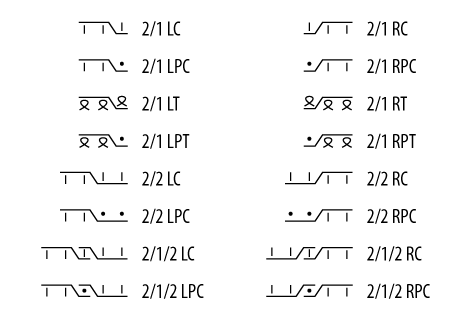
Crosses with 2-stitch strands have always been my favorites: plenty of texture without the bulk of a three-stitch strand.
Crosses with 3-stitch strands on top

Bold crosses with 3-stitch strands don’t appear in cabled stitch patterns as often as those with 2-stitch strands, but they’re common enough.
Wide but plain crosses
On occasion, you’ll see a really wide but plain cross, typically for dramatic effect.
So I figure these are the cable crosses that Stitch-Maps.com will support for starters. More can be added later, if need be.
That’s 48 crosses, by my count. It seems manageable to me. Does it sound reasonable to you?
Like I said, I think most cabled stitch patterns are best charted using traditional, grid-based charts. Then you can use simple, streamlined symbols like these:
But with stitch maps? You can’t rely on a surrounding grid for context. In some way, each symbol has to indicate how many stitches are being crossed, and how those stitches are being worked. This means symbols like those above just aren’t appropriate: without a surrounding grid, they don’t clearly show how many stitches are involved in the cross.
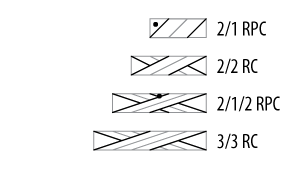
So for a long time, I had figured that Stitch-Maps.com would make use of symbols like these:
I think of them as “Japanese” because they’re used in Japanese publications, but they appear in some US publications too. Each diagonal line represents a stitch, crossing over or under. Straightforward, right? An easy choice.
Not so fast. These symbols get pretty darn messy when they’re wide:

Or when the stitches are knit through back loop to twist:

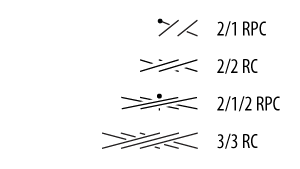
So, in the name of legibility – the degree to which symbols are “understandable or recognizable based on appearance” – now I’m thinking Stitch-Maps.com will display cable cross symbols like these:
I call these “lightning bolt” or “zig-zag” symbols: zig-zag lines indicate the number of stitches in each strand and how the strands cross, and individual mini-symbols tell you how to work each stitch. Super clear; super legible.
The downside to these symbols? I don’t find them quite as intuitive as other cable cross symbols. But I figure their legibility makes them worth it.
Your thoughts?
When it comes to cable cross abbreviations like 2/2 RC, the StitchMastery Knitting Chart Editor really gets it right. That piece of charting software recognizes a slew of cable cross abbreviations, all in the same form:
- The first half of the abbreviation specifies the number of strands, and the number of stitches in each strand: “x/y” is a two-strand cross with x stitches crossing over y stitches, and “x/y/x” is a three-strand cross with x stitches on each side exchanging places while y stitches remain untouched in the middle.
- The second half of the abbreviation specifies how the strands should cross and how the stitches should be worked.
It’s in the latter half of the abbreviations that StitchMastery KCE really shines. Many publications use the following:
- LC, left cross: hold cn to front; knit all the stitches
- RC, right cross: hold cn to back; knit all the stitches
- LPC, left purl cross: hold cn to front; purl background stitches, knit foreground stitches
- RPC, right purl cross: hold cn to back; knit foreground stitches, purl background stitches
But StitchMastery KCE goes a step further, and uses the following in addition:
- LT, left twist: hold cn to front; knit all stitches through back loop to twist
- RT, right twist: hold cn to back; knit all stitches through back loop to twist
- LPT, left purl twist: hold cn to front; purl background stitches, knit foreground stitches through back loop
- RPT, right purl twist: hold cn to back; knit foreground stitches through back loop, purl background stitches
I like these additions. They make it possible to express stitch patterns like those found in Twisted-Stitch Knitting and Bäuerliches Stricken.
But these additions kind of conflict with common interpretations of “LT” and “RT.” In many publications, LT by itself (not prefaced by x/y or x/y/x) means “bring right needle behind first st on left needle and knit second st, then knit first st, then drop both sts off left needle” – that is, work a 1/1 LC without a cable needle. Likewise, RT often stands for working a 1/1 RC without a cable needle.
Is this a problem? I don’t think so. I imagine that Stitch-Maps.com can always use 1/1 LC and 1/1 RC to refer to 1-over-1 crosses, regardless of whether they’re worked with or without a cable needle. Then it could use x/y LT and x/y RT to refer to left and right crosses (of various sizes) in which all the stitches are knit through back loop to twist. Further, I’m figuring that Stitch-Maps.com can recognize “unadorned” LT and RT, and substitute 1/1 LC and 1/1 RC accordingly, much as it already recognizes, say, sk2p and substitutes sl1-k2tog-psso.
Your thoughts?
The first step in adding support for a new set of stitches to Stitch-Maps.com is figuring out what abbreviations to recognize. Which bits of text should map (no pun intended!) to which symbols?
With cable crosses, that’s no small feat! In Charted Knitting Designs, Barbara Walker lists 80 basic cable crosses, and notes many more are possible. When you combine all the possibilities – two or three “strands” (groups of stitches), crossing to the left or right, each composed of 1, 2, 3, 4, or more stitches, worked as knits or purls or something else – you get hundreds of possible crosses. Whew!
The challenge, then, is choosing a system of abbreviations, one with a regular, predictable structure, such that each abbreviation is concise, meaningful, and unambiguous. Oh, and bonus points if the system of abbreviations covers all the major bases.
Looking through my stitch dictionaries and other knitting books, I found way more options than I’d anticipated:
- A few books spell out all the steps for each cable cross within the instructions for each stitch pattern. Way too verbose!
- Many books use abbreviations like “C4B” for “cable 4 back.” I’ve never been fond of these abbreviations, as they’re incomplete and ambiguous. Of the 4 stitches in the C4B cable cross, do I hold 1 in back (for a 3-over-1 right cross), 2 in back (for a 2-over-2 right cross), or 3 in back (for a 1-over-3 right cross)? And do I knit all the stitches, or purl the ones held in back, or …? Essentially, abbreviations like C4B are too abbreviated. They don’t provide all the necessary information.*
- Patterns for Guernseys, Jerseys, & Arans by Gladys Thompson takes an interesting approach. For a 2-over-2 right cross, it uses “s2b, k2, k2ss” for “slip 2 sts to cn and hold in back, k2 from left needle, k2 slipped sts from cn.” A handful of “component” abbreviations combine to create a practically unlimited number of cable crosses, with a minimum of verbosity and ambiguity. Alas, this system of abbreviations is too obscure. With Stitch-Maps.com, I already have my hands full creating a new way of charting stitch patterns and sharing it with the knitting world. I don’t need to champion an uncommon system of cable cross abbreviations.
- Abbreviations like “2/2 RC” (for “2-over-2 right cross”) have always been my favorites. They’re used in Knitter’s Magazine and other XRX publications, Interweave publications, and the works of Janet Szabo, among others. They’re concise, clear, and unambiguous.
So I’m going with abbreviations like 2/2 RC. They’re not infinitely flexible – for example, they don’t make it easy to say, “cross 3 stitches to the left over 2 stitches, keeping all of them in k1 tbl, p1 twisted rib” or “cross 2 stitches to the right over 2 other stitches, working the last 2 stitches as k2tog.” But they cover all the major bases; they handle all your “normal,” everyday cable crosses. Besides, I’m not aiming to support every last possible cable cross at Stitch-Maps.com. Remember, that’d be hundreds of crosses. And stitch maps aren’t ideal for most cabled stitch patterns anyway.
*C4B, C4F, and the like are common enough that I’ll probably set up Stitch-Maps.com to recognize them, and to interpret them as 2/2 RC, 2/2 LC, and so on. This site site already takes this approach with other stitches – for example, interpreting “yfwd” as “yo” – in the name of accepting a wide variety of written instructions but presenting consistent knitspeak.